Understanding Cashless Vending Readers and Hardware Compatibility
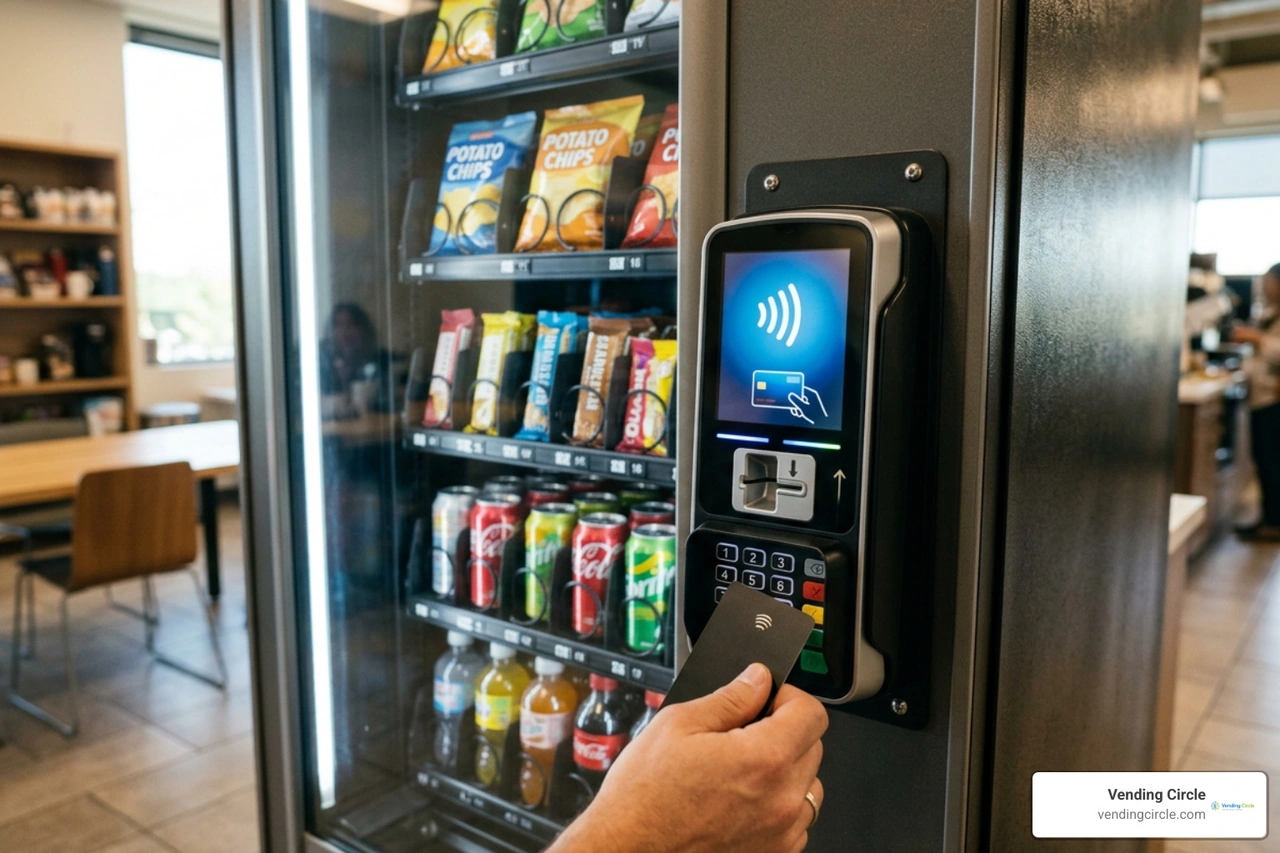
When we talk about cashless vending readers, we are looking at unattended payment terminals designed specifically for self-service retail. These compact units do much more than read credit cards; they act as gateway computers that handle live card authorizations, communicate directly with the Vending Machine Controller (VMC), and send live transaction telemetry to cloud management platforms.
At the heart of modern vending technology is the Multi-Drop Bus (MDB) protocol. Standardized by NAMA, MDB is the digital language that allows your machine’s main control board (acting as the master) to talk to payment peripherals (acting as slave devices), such as coin changers, bill validators, and card terminals. Operating on a 24V DC power line, MDB allows multiple payment devices to daisy-chain off a single bus.
In addition to MDB, modern setups utilize DEX (Digital Exchange) telemetry. While MDB controls live payment processing and tells the machine when to dispense a product, DEX cables plug into a 1/4-inch jack on the control board to pull inventory tracking data, sales totals, and operational diagnostics. Using integrated payment systems with DEX telemetry gives us real-time visibility into inventory levels and machine health via remote cloud dashboards, streamlining Vending Machine Inventory Management across your entire route.
For operators evaluating hardware options, explore our comprehensive breakdown of modern Vending Card Readers to compare features and specs.
Compatibility Checks Before Adding a Card Reader to a Vending Machine
Before purchasing hardware or picking up a screwdriver, we must perform a quick technical audit of the vending machine. Skipping compatibility checks is the leading cause of installation delays and order cancellations.
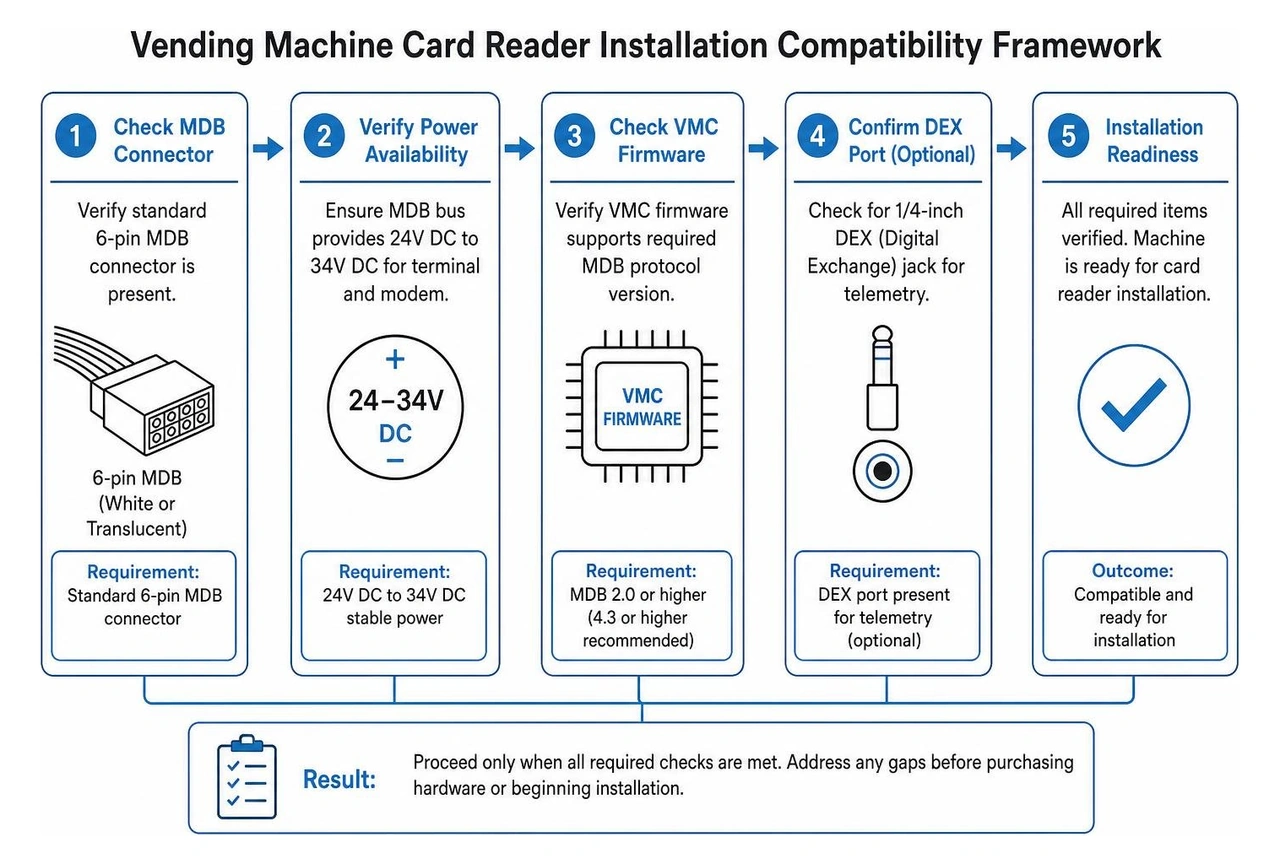
Here is what we need to verify:
- 6-Pin MDB Connector Standard: Open the vending door and inspect the wiring harness connected to the bill validator or coin mech. You should see a standard white or translucent 6-pin connector. Machines manufactured after 1995 generally feature native MDB support.
- Power Voltage Availability: The MDB bus provides 24V DC to 34V DC power to run the terminal and its cellular modem. Ensure your main power supply delivers steady voltage without drops.
- VMC Firmware Version: MDB protocol version 2.0 or higher is required for basic cashless functions, while MDB version 4.3 or higher is ideal for multi-vend, remote price changes, and advanced telemetry.
- Cellular Signal Strength: Unattended payment terminals rely on 4G LTE or 5G cellular modems. Before mounting anything, check cellular carrier signal strength at the exact machine footprint using your mobile phone or a signal meter.
- Legacy Interface Adapters: If your machine uses an older single-price or analog "micromech" interface (often identified by 12-pin or 15-pin coin plugs), direct plug-and-play installation won't work without specialized MDB conversion kits.
Checking these details in advance saves significant troubleshooting time later. For a deeper technical perspective on compatibility standards, consult this Pro Guide for adding a card reader to a vending machine.
Step-by-Step Guide to Adding a Card Reader to a Vending Machine

Physical installation of a cashless card reader is straightforward once compatibility is confirmed. Most operators complete a standard retrofitting job in 30 to 60 minutes per machine. Working carefully prevents accidental short circuits or damage to sensitive electronic control boards.
Preparing Tools and Mounting Hardware
Before starting, gather the fundamental mechanical tools and mounting hardware. Having everything on hand keeps your route installation schedule moving smoothly.
You will need:
- Screwdrivers: Standard Phillips (#2) and flathead screwdrivers.
- Nut Drivers & Socket Wrenches: 11/32-inch and 1/4-inch nut drivers for mounting studs and ground wires.
- Step Drill Bit & Drill: A 1/2-inch step bit and high-torque cordless drill if your machine cabinet lacks a factory knockout plate.
- Knockout Faceplate or Template: Paper drill template supplied by the manufacturer or standard POS knockout cover plate.
- Pass-Through MDB Harness: A standard MDB "T-harness" for daisy-chaining payment peripherals.
- Zip Ties & Adhesive Cable Clips: Essential for routing cables away from moving spiral motors and door hinges.
Step-by-Step Guide to Adding a Card Reader to a Vending Machine
Follow this step-by-step procedure to mount, wire, and secure your vending payment terminal correctly.
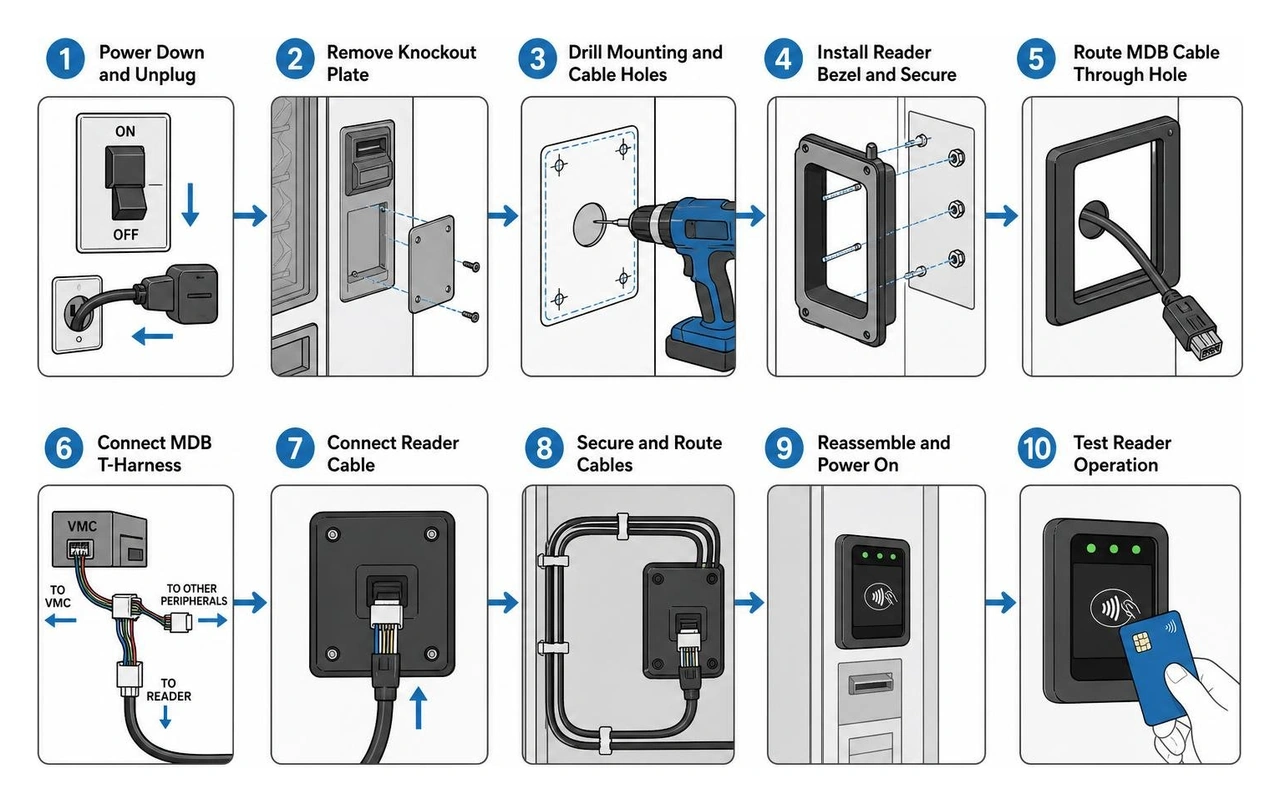
Step 1: Electrical Safety and Power Down
Always switch off the main power breaker on the machine and unplug the main power cord from the wall outlet before opening cabinet access doors or touching internal wiring. Working on live MDB harnesses can blow fuses on the VMC board.
Step 2: Mount the Reader Faceplate
Locate the factory knockout plate on the front face of the machine (typically above or beside the bill validator). If present, unscrew the cover plate. If mounting on a solid metal faceplate, affix the paper drill template at an ADA-compliant height (under 48 inches from the floor), punch pilot holes, and use your 1/2-inch step bit to drill the center cable hole and 4 mounting stud holes. Insert the reader bezel studs through the front of the door and tighten nut fasteners securely from the inside cabinet panel.
Step 3: Connect the MDB T-Harness (Daisy-Chaining)
Locate the 6-pin white MDB connection running between the machine controller board and the existing bill validator or coin mechanism. Unplug this connection and insert the card reader’s MDB T-harness directly in-line. This daisy-chain configuration allows all payment devices—coin mech, bill acceptor, and card reader—to share power and data lines simultaneously without requiring extra control board expansion slots. For detailed step-by-step walkthroughs, see this guide on how to add a card reader to a vending machine.
Step 4: Connect the DEX Telemetry Cable
Plug the reader’s 1/4-inch DEX jack directly into the DEX port on the vending machine logic board. This enables automatic single-source-of-truth inventory tracking and audit reporting to your cloud dashboard.
Step 5: Mount and Route the Cellular Antenna
If your card reader utilizes an external cellular antenna, position it as high up on the interior cabinet face as possible, preferably near a plastic or glass window panel. Metal vending machine cabinets act like Faraday cages, blocking cellular signals. If the machine is located indoors or in a basement, consider routing an external high-gain antenna through the top cabinet cap to ensure uninterrupted connectivity.
Step 6: Secure All Cabling
Use zip ties and adhesive clips to bundle all loose cables neatly against the inner door frame. Ensure zero movement or cable sagging near spiral coils, drop sensors, delivery bins, or door hinges to avoid communication time-out errors. Review this reference on how to install card reader vending machine for additional wiring best practices.
Activation, System Testing, and Remote Monitoring

Once physical wiring is complete, the next phase involves software activation, system testing, and establishing cloud telemetry connections.
Initial Setup and Transaction Testing
With the hardware installed, restore main power to the vending machine. The card reader screen should light up and begin its boot-up sequence, displaying initialization messages as it searches for cellular towers and negotiates network authorization with the payment gateway.
Here is how to complete setup:
- Register the Terminal Serial Number: Log into your merchant management portal on a smartphone or tablet. Claim the reader by entering its unique serial number or scanning its barcode to link the device to your operator account and specific machine location.
- Configure MDB Level Settings: Ensure the machine controller is configured for MDB Level 3 cashless operation. This enables advance features such as multi-vend pricing, pre-authorization holds, and contactless tap-to-pay functionality.
- Execute Live Test Vends: Conduct several real test purchases using multiple payment channels:
- Insert a physical credit/debit card with an EMV chip.
- Swipe a magnetic stripe card.
- Perform a contactless tap purchase using a mobile wallet like Apple Pay or Google Pay.
- Verify Dispense and Settlement: Confirm that the card reader displays "Approved," the VMC triggers the correct drop spiral, the product releases, and the transaction records immediately in your cloud dashboard.
For step-by-step software setup tips, check out this guide on how to set up Cantaloupe card reader for Vending Machines.
Ongoing Maintenance and Connectivity Management
Maintaining consistent uptime across your cashless payment terminals is critical for protecting overall sales volume. Cash-only machines miss up to 71% of total transaction opportunities, so maintaining stable connectivity is paramount.
To keep card readers running reliably:
- Monitor Cellular Signal Levels: Aim for a target signal strength of -85 dBm or stronger inside your operator portal. Signals weaker than -100 dBm cause transaction latency and dropped authorizations.
- Install High-Gain External Antennas: When placing machines in steel-reinforced breakrooms, parking structures, or basements, install top-mounted external antenna extensions to bypass metal cabinet interference. Learn more about managing machine communications in our detailed article on Vending Machine Network Connection.
- Physical Cleaning Protocols: During routine restocking visits, wipe down contactless tap windows and optical card insert slots using non-abrasive lint-free cloths. Inspect ports for physical wear or tampering attempts.
- Handling Failed Authorizations and Refunds: If a product fails to dispense after a successful card tap, modern optical drop sensors automatically instruct the card reader to void the authorization immediately. Operators can also process zero-contact customer refunds remotely via their cloud portal dashboard without visiting the location in person.
To learn more about cloud platform integration, read this article on how to add a card reader to a vending machine.
Costs, Financial ROI, and Benefits of Adding a Card Reader to a Vending Machine
Adding cashless payment capability to your vending operation requires an upfront investment, but the financial return is usually rapid. Operators adding card readers report an immediate total machine sales lift between 25% and 40%, with average transaction values jumping from $1.50 (cash) to over $3.00 (cashless) as customers purchase higher-margin snacks and multiple items in a single tap.
Let's break down the overall cost structure and return on investment:
| Cost Component | Retrofit Card Reader | Factory-Integrated System |
|---|---|---|
| Upfront Hardware Cost | $150 to $400 per unit | Built into machine purchase price |
| MDB Conversion Kits (Legacy) | $150 to $300 (if needed) | Not applicable |
| Monthly SIM / Telemetry Fee | $5.00 to $10.00 / month | $5.00 to $12.00 / month |
| Card Processing Rates | 3.5% to 5.95% + flat transaction fee | 3.5% to 5.5% blended |
| Average Sales Volume Lift | +25% to +40% revenue | Baseline optimized |
| Typical ROI Timeframe | 3 to 6 months | Immediate operational efficiency |
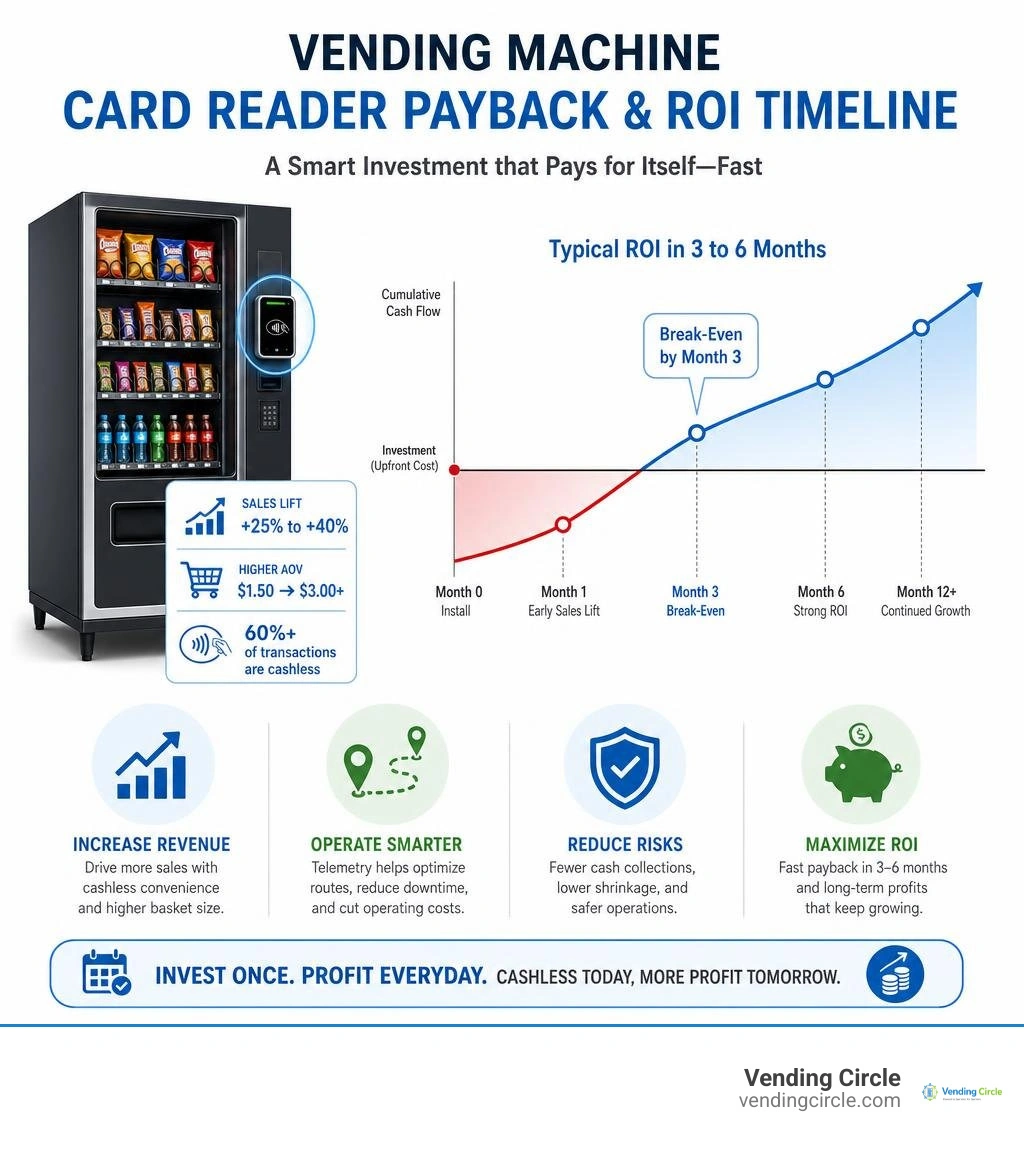
With over 60% of all vending transactions processed cashlessly (and over 80% in high-income demographics), cashless terminals eliminate payment barriers. Furthermore, telemetry integration enables route optimization, reducing fuel costs and restocking trips by telling you exactly what items need refilling before leaving the warehouse. Check out our comprehensive technical breakdown in the Card Reader for Vending Machines Installation Guide.
For operators looking to expand their route footprint, explore our expert guides on Vending Machine Locations and Vending Machine Routes Guide 2026.
Frequently Asked Questions About Vending Payment Systems
Can you add a card reader to older non-MDB vending machines?
Yes, you can retrofitting older non-MDB legacy vending machines is common practice. Older machines that use a "dumb machine interface" with 12-pin or 15-pin coin changer plugs require an MDB conversion kit (costing roughly $150 to $300). This module acts as a digital bridge, translating MDB commands from the modern card reader into signals the older controller board understands. In most cases, you will also need to upgrade the existing coin mechanism and bill validator to MDB-compatible models.
What happens if a card reader loses cellular signal during a transaction?
If a card terminal loses connection during a swipe or tap attempt, the onboard system times out and voids the pending authorization within seconds. The customer's bank account is not charged. Modern card readers attempt to reconnect automatically. If a machine operates in a persistent cellular dead zone (worse than -100 dBm), you can resolve connection drops by attaching an external high-gain antenna, extending antenna wiring to an upper floor, or connecting the payment reader to local Wi-Fi or Ethernet.
How are refunds and transaction errors handled for cashless purchases?
Cashless vending transactions utilize real-time communication between drop sensors (optical drop sensors) and the payment terminal. If a customer taps their card, selects an item, and the coil turns but the product fails to drop, the drop sensor detects the failure and signals the VMC to void the authorization immediately. If an error ever slips through, operators can log into their backend payment dashboard from any browser or smartphone app to issue instant full or partial refunds directly back to the customer's card.
Conclusion
Upgrading your vending route by adding a card reader to a vending machine is one of the highest-ROI investments you can make in 2026. Transitioning from cash-only operations to a cashless digital network increases sales revenue, unlocks higher-priced inventory sales, and provides cloud telemetry tracking that simplifies inventory and route management.
Whether retrofitting older equipment with MDB conversion kits or upgrading modern glass-front units with integrated payment systems, having a clear understanding of hardware compatibility, proper wiring, and backend setup ensures continuous uptime and customer satisfaction.
At Vending Circle, we support vending operators through every stage of growth. Through our platform, members gain access to direct wholesale pricing on machines, discounted payment hardware, live weekly Q&A sessions, and a thriving community of experienced operators sharing real-world business insights. To learn more about how our platform supports your operator journey, check out What is Vending Circle, souring discounted stock via Vending Machine Products Wholesale, or reach out via our Contact page.
Ready to scale your route with industry-leading equipment? Explore Vending Machines today to find cashless-ready equipment built for maximum profitability.